1. Floor Insulation
What is floor insulation?
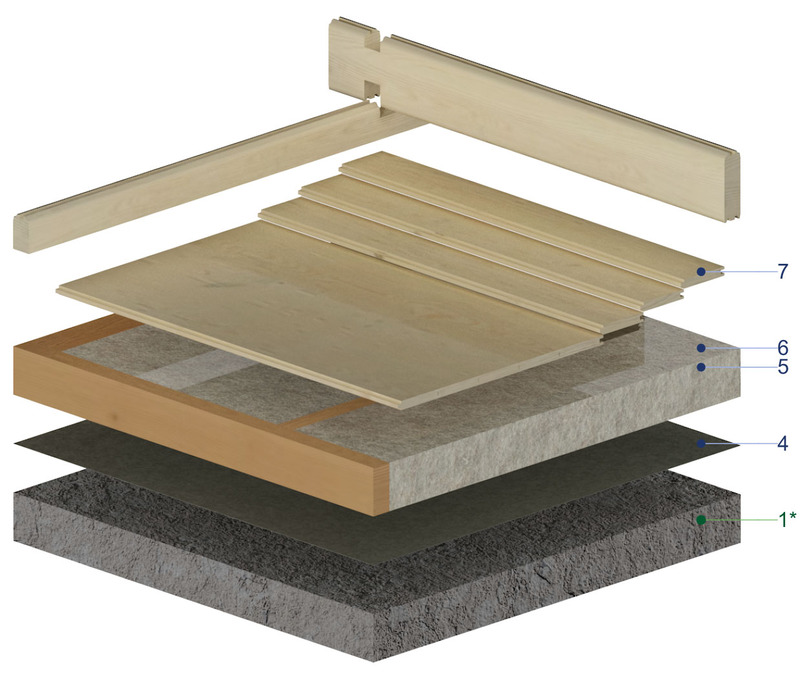
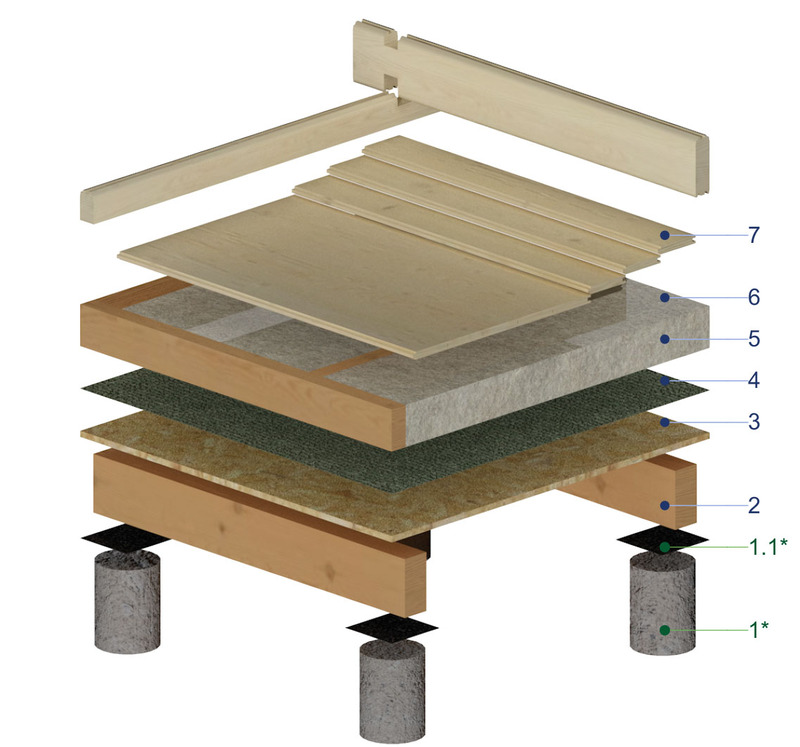
A floor insulation kit helps reduce heat loss through the floor and improves indoor comfort by limiting the transfer of cold and moisture from the foundation area.
The insulation material is installed between the floor bearers, below the tongue-and-groove floor boards.
The exact floor structure depends on the foundation type:
- Slab foundation – a vapour barrier is installed directly over the foundation;
- Pile foundation – the floor structure includes supporting foundation bearers, 12–15 mm water-resistant chipboard and a breathable membrane below the insulation.
The dimensions of the floor bearers, required fasteners and installation method depend on the selected insulation thickness and project specification.
5. Floor Insulation Installation
5.1 Installation on a slab foundation
Step 1: Check that the slab foundation is level, dry and prepared according to the foundation plan. Install the required waterproofing and anchoring components.
Step 2: Lay the vapour barrier over the slab foundation. Overlap and seal all joints according to the membrane manufacturer’s instructions. Avoid puncturing or damaging the membrane during installation.
Step 3: Position the floor bearers according to the supplied floor plan. The bearer dimensions depend on the selected insulation thickness:
- 50 mm insulation – 60 × 44/58/68 mm floor bearers;
- 100 mm insulation – 44 × 100 mm floor bearers;
- 150 mm insulation – 44 × 147 mm floor bearers;
- 200 mm insulation – two layers of 44 × 100 mm floor bearers.
Secure the floor bearers using the fasteners and anchoring components specified in the project drawings.
Step 4: Insert the mineral wool insulation between the floor bearers. Fill the complete space without leaving gaps, but do not compress the insulation excessively.
For the 200 mm system, install two 100 mm insulation layers. Arrange the second layer so that the insulation joints do not align with the joints of the first layer.
Step 5: Check that the insulation is dry, evenly installed and does not extend above the floor bearers.
Step 6: Install the 19 mm or 28 mm tongue-and-groove floor boards over the floor bearers. Secure them using the floor-board nails specified in the project documentation.
5.2 Installation on a pile foundation
Step 1: Check that the pile foundation is level and prepared according to the foundation plan. Install waterproofing between the foundation and the timber components where required.
Step 2: Install the foundation bearers according to the supplied foundation and floor plans. The standard detail uses 68 × 140 mm foundation bearers at maximum 800 mm centre-to-centre spacing unless specified differently in the project documentation.
Step 3: Attach the 12–15 mm water-resistant chipboard to the foundation bearers. Install the boards tightly and support all board joints. Use the fasteners and spacing specified in the project documentation.
Step 4: Lay the breathable membrane over the water-resistant chipboard. Overlap and seal the membrane joints according to the membrane manufacturer’s instructions. Avoid damaging the membrane during the remaining installation work.
Step 5: Install the floor bearers over the prepared structure. Their dimensions depend on the selected insulation thickness:
- 50 mm insulation – 60 × 44/58/68 mm floor bearers;
- 100 mm insulation – 44 × 100 mm floor bearers;
- 150 mm insulation – 44 × 147 mm floor bearers;
- 200 mm insulation – two layers of 44 × 100 mm floor bearers.
Secure the floor bearers to the foundation bearers using the screws specified in the project drawings.
Step 6: Insert the mineral wool insulation between the floor bearers. The insulation must fit closely around the timber elements without gaps or excessive compression.
For the 200 mm system, install two layers of 100 mm mineral wool with staggered joints.
Step 7: Check that all insulation is dry, correctly positioned and protected by the surrounding membranes.
Step 8: Install the 19 mm or 28 mm tongue-and-groove floor boards and secure them using the floor-board nails specified in the project documentation.